
Long Video Face Swap: Split Clips and Keep the Original Audio
Turn a long recording into a shot list, process only the clips that need a face swap, and return them to the original timeline without duplicating the audio.
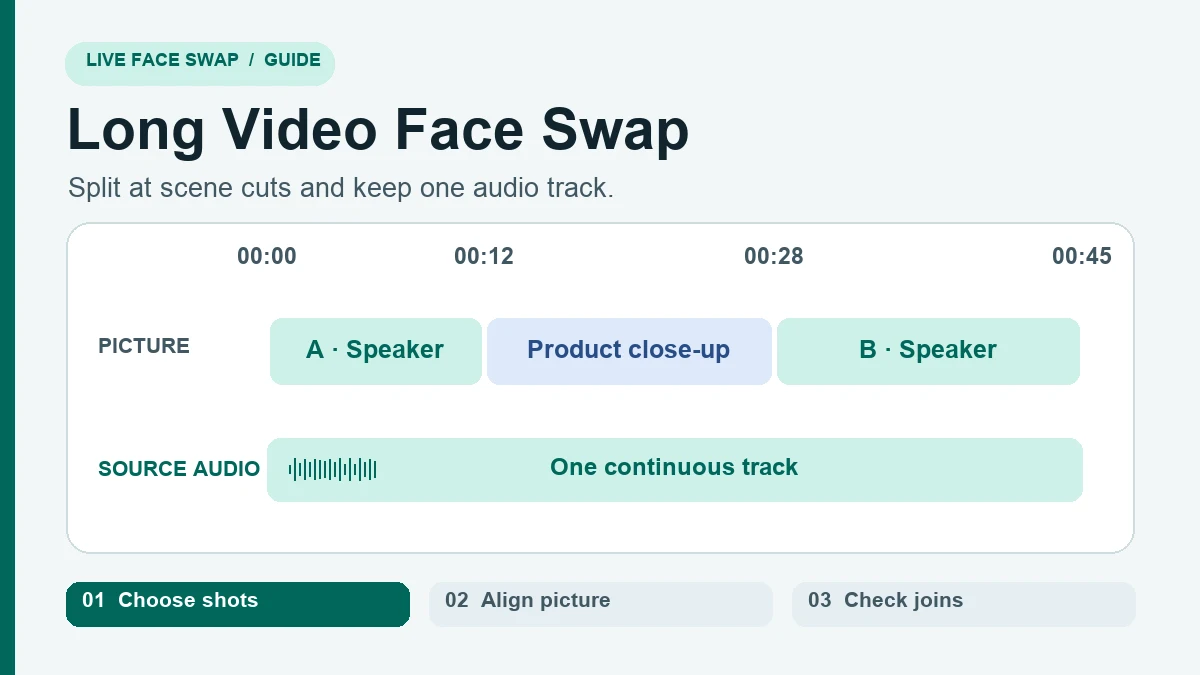
For a five-minute edit, keep the original video on a timeline and swap the face only in shots that need it. For a 45-second demo with two close-ups and a product shot, that can mean preparing two short MP4s and leaving the rest of the timeline alone. The Video Face Swap workspace accepts one 1–30 second H.264 MP4 per job, up to 32 MB, with AAC audio or no audio. Cutting and assembling the longer edit happens in your video editor.
Decide first whether you need a changed face in every appearance or just in a few inserts. That choice controls the edit. For a continuous interview where the speaker is always in view, splitting at 30 seconds may put a visible seam in the middle of a sentence. For a demonstration that cuts between a speaker and their hands, the object close-up gives you a clean place to leave the picture alone and carry the narration through.
If you are starting from a five-minute file and only want a new 15-second excerpt, export that excerpt and finish it as a short clip. Use the timeline method below when the finished piece still needs to run for the original length.
1. Make a shot list before you export
Duplicate the edit or save a new project version. Mark where the person appears clearly and where a cut changes the camera angle, light, or distance. Use a full gesture or spoken phrase as the unit of work. If one shot runs past the upload limit, look for a natural pause or a place where you can cut to another view. If the shot must play uninterrupted, choose a workflow that can process the whole shot.
Here is an example shot list for a 45-second product demo you recorded with permission. End times mark the start of the next shot.
| Timeline range | Picture | Edit |
|---|---|---|
| 00:00–00:12 | Presenter introduces the product | Export shot A |
| 00:12–00:28 | Close-up of the product, with voice continuing | Keep the original picture |
| 00:28–00:45 | Presenter answers a question from a new angle | Export shot B |
The two selected clips run 12 and 17 seconds. Name the exports with their original start times, for example A-0000.mp4 and B-0028.mp4. Put extra notes, such as a quick head turn at 00:36, in the shot list so you can find that moment after processing.
For a longer project, add three columns to this list. Record the reference photo used, the take you approved, and the exact frame where the inserted picture ends. Mark shots with no visible face as original. Mark appearances you cannot cleanly change as review, so you can decide whether to keep them, cut away, or use another workflow. That keeps an unprocessed glimpse from slipping into an edit that is meant to show one continuous appearance.
Work from natural cuts first. A camera change, a product insert, or a cut to a listener lets you replace a bounded shot without asking two independently generated clips to meet on the same turning face. If you have to split a long take, choose a stiller pause, note which frame belongs to each side, and compare those two boundary frames before processing the rest. Keep the original sequence untouched so you can return to it if a join is visible.
Export each selected range as its own file. Match the crop and orientation of the original sequence and keep a consistent export preset across shots. If one file is too large or was recorded with HEVC, use the HEVC to MP4 preparation guide. After export, open each file and confirm its first and last visible actions against the timeline. A well-named clip can still contain the wrong range.
12-second silent diagram of the 45-second example. It marks the shots to replace, aligns them over the source, and highlights the joins.
2. Check one difficult shot before processing the rest
Start with the shortest clip that includes a demanding moment, such as a clear face turning toward a side light. Use one authorized reference portrait and keep it available for every shot of that person. Look at the maximum credit quote before starting each job. The short MP4 walkthrough shows the file, quote, preview and download steps.
Play the first result at normal speed, then stop on the demanding moment. Compare the source and result at that same time. If a hand hides the mouth or the face jumps after a turn, try a different cut or keep the original image for that portion. A clean front-facing frame tells you little about what happens later in the shot.
In the example, start with shot B if its turn at 00:36 is the harder moment. The clip begins at 00:28, so that turn should be about eight seconds into the exported file. Write down the timestamp in both forms. That gives you a repeatable way to compare the same action in the original, workspace preview and saved result. If the mouth or eyes look different as the subject comes back toward camera, inspect several adjacent frames. A single still can hide a brief jump between expressions.
Use the shot that passes as your visual reference for the rest of the edit. Keep the same portrait and compare a comparable expression across A and B. If the face looks close but the color changes at the cut, view the original angles side by side to see how much of the shift was already present. If the identity itself looks different, test a smaller change first. For instance, choose an adjacent range from the same angle and keep the portrait fixed. Changing the cut, portrait and lighting treatment together makes it hard to isolate the cause.
A long edit may need multiple jobs. Check the quote for each submitted shot and approve one hard segment before committing to the rest. The longer assembly has its own export settings in your editor.
3. Put the changed picture back on the original timeline
Import the result above the original video and line up its first matching frame with the saved start time. Check the last frame against the cut. If the processed clip ends slightly early, inspect the gap before using a cutaway or choosing a different cut point. Stretching the clip to fill the gap can pull the mouth away from the dialogue.
If the original edit already has a finished audio track, keep it playing and mute the imported clip's audio. Play through 00:12 and 00:28 in the example. Listen for a doubled voice, an abrupt jump in room tone, or a pause that got shorter. If you hear a duplicate, solo the original track to confirm the timing before changing the picture.
Keep your mix on one track
Start by locking the original dialogue or finished mix on the timeline. Place the video result on a track above the source, then disable its imported sound. If your editor groups picture and audio, unlink that imported pair before moving just the picture. Keep music and room tone where they already belong. When the replacement ends on a cut to a product shot, the voice should continue through the change exactly as it did in the original.
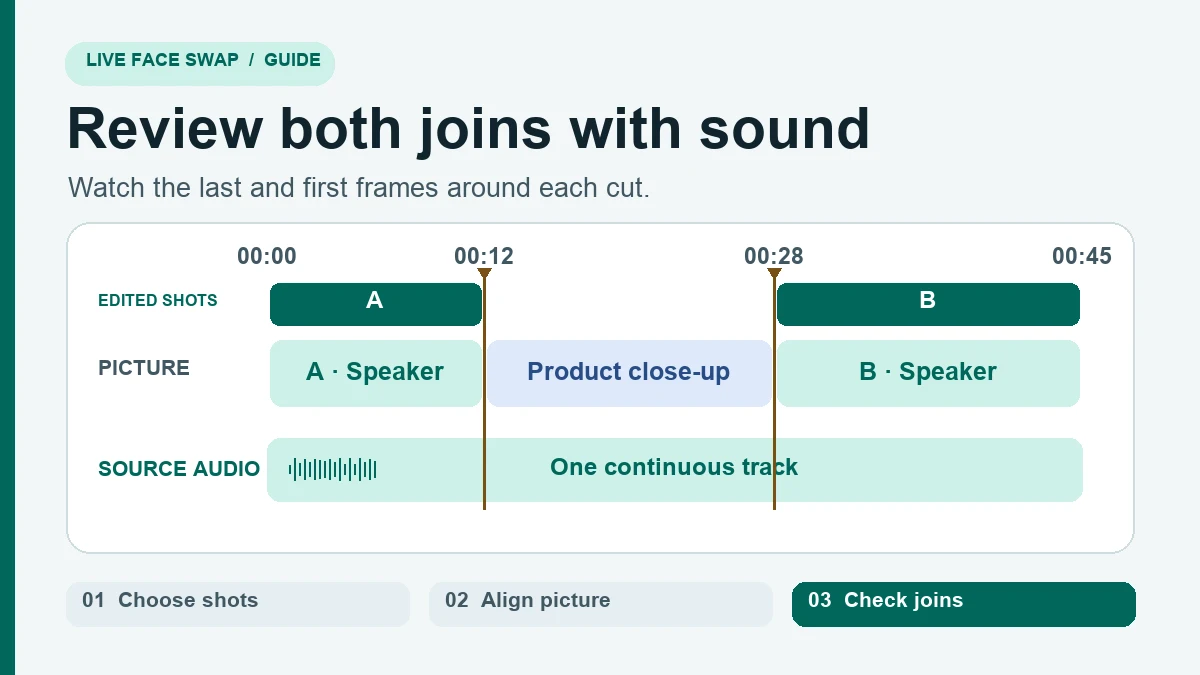
Two replacement clips sit above the original video. The middle product shot and the source audio continue through both cuts.
Check both ends after alignment
Use a clear visual marker such as the presenter putting the product on the table. Compare the moment of contact in the original and the new clip. If the first movement matches but the last one does not, compare clip durations and check for accidental speed changes or a different out-point. If all visible movements are offset by the same amount, adjust the replacement picture against the locked audio and check again. Where there is dialogue, check a word with an obvious lip closure early and late in the shot.
Turn the replacement track on and off to compare framing. If the processed file is smaller than the sequence, examine it at final viewing size. Raising the export resolution cannot recover detail lost in a wider shot or an earlier encode. A cut to the original product close-up can be a cleaner choice than stretching the replacement image to cover an unsuitable range.
Review the full edit in one pass
Compare the face in shots A and B for changes in appearance and check the joins at normal speed. Verify the framing on the intended screen, especially if the destination is vertical. Export the full edit from the editor, open the saved file and replay at least one line on each side of the replacement.
The shot list illustrates the editing workflow. It is useful even when only one shot needs a replacement, since you can keep the rest of the picture and the original sound in place.
Questions that come up on longer edits
Can I split the whole video into equal 30-second blocks?
Use scene boundaries as your first choice. Equal chunks fit a time limit, but they may split a word, a rapid turn, or a continuous camera move. If the shot has to run without a cut, use a workflow that can take that complete shot or test the join before committing to the sequence.
Can I join the downloaded MP4s directly?
You can use a video editor to assemble the shots, but include every unchanged section and decide which sound track should play. In the 45-second example, joining A directly to B loses the 16-second product shot and the part of the narration over it. Putting the two results above the original edit keeps the timing of all three sections.
What should I save before closing the project?
Keep the original, your shot list, the approved exports and the final edit. Match the file names to the timeline markers. When a later review asks for a new cut or a correction to just one angle, you can swap in one clip without rebuilding the entire edit.